A burst pipe is one of the most expensive surprises winter can deliver. When water inside a pipe freezes, it expands, and that expansion can split copper or plastic lines and flood a home once the ice thaws. The good news is that frozen pipes are largely preventable with inexpensive, simple steps. Late October is the ideal window to do the work: the weather is still mild enough to work comfortably in a crawl space or garage, and everything is in place before the first hard freeze arrives. This checklist walks through the vulnerable spots, the prep steps, and exactly what to do if a pipe freezes — or worse — despite the precautions.
Why Pipes Freeze in the First Place
Water freezes at 32°F (0°C), but pipes rarely freeze the moment the outdoor temperature touches that mark. They freeze when cold air reaches them long enough to pull the water inside down to freezing — which is why location matters more than the thermometer on the wall. The pipes most at risk are the ones exposed to cold air:
- Pipes running along exterior walls, especially on the north side of the house
- Lines in unheated basements, crawl spaces and garages
- Plumbing in uninsulated wall cavities and attic runs
- Outdoor faucets (hose bibs) and the pipes feeding them
- Supply lines to outbuildings or additions that are heated less than the main house
Wind makes everything worse: cold air forced through gaps in the foundation or siding can chill a pipe far faster than still air, which is why sealing drafts is part of pipe protection, not just comfort. Homes that are being winterised for the season should treat plumbing alongside everything else on a home winterizing checklist rather than as an afterthought.

Step 1: Insulate Every Exposed Pipe You Can Reach
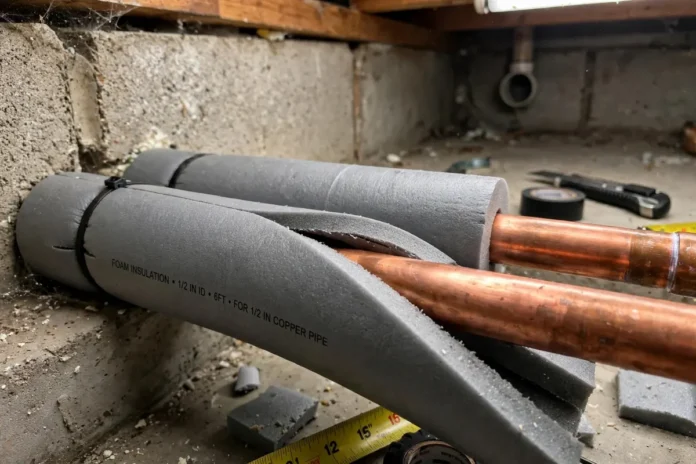
Pipe insulation is the single best value in freeze prevention. Foam sleeves — the pre-slit tubes sold in any hardware store — slip over exposed pipes in minutes and need only a utility knife and tape for the joints. They are inexpensive per length, and covering every accessible run in a basement, crawl space or garage is usually an afternoon’s work.
For pipes that are especially exposed, or in regions with severe cold snaps, add electric heat tape (also called heat cable) under the insulation. Heat tape warms the pipe directly and is typically thermostatically controlled, switching on as temperatures fall. Follow the manufacturer’s instructions exactly: use only tape rated for the pipe material, never overlap it unless the product allows it, and plug it in before the cold arrives.
Don’t forget the elbows and joints. Ice forms at fittings and valves as readily as on straight runs, so wrap corners with insulation tape rather than leaving them bare between sleeves.
Step 2: Seal the Drafts That Chill Pipes
Insulation slows heat loss, but cold air moving across a pipe defeats it. Walk the basement and crawl space on a windy day and feel for moving air. Common entry points include foundation cracks, gaps around pipes and cables that pass through exterior walls, dryer vents, and the rim joist where the house framing meets the foundation.
Seal small gaps with caulk and larger ones with expanding foam or foam board. This step pays twice: it protects pipes and reduces heating costs. The same draft-hunting mindset applies around windows and doors — the approach in this guide to fixing drafty windows before winter pairs naturally with pipe work, since both are about keeping cold air away from the warm parts of the house.

Step 3: Prepare Outdoor Faucets and Hoses
Outdoor faucets are the most common freeze failure in otherwise well-kept homes, because the pipe feeding them runs through an exterior wall and sits full of water all winter if it is not drained. The routine is simple:
- Disconnect every garden hose, drain it, and store it indoors. A hose left attached traps water in the faucet and the pipe behind it, and a frozen hose can split the faucet itself.
- Shut off the interior valve that feeds each outdoor faucet, if the house has one.
- Open the outdoor faucet to drain any remaining water, then leave it open or close it once fully drained, according to the faucet type.
- Fit an insulated faucet cover over each outdoor faucet for the season.
An in-ground sprinkler system needs its own winterising — typically blowing out the lines — before the first freeze as well.
Step 4: Protect Pipes During the Coldest Nights
When a hard freeze is forecast, a few habits make a real difference:
- Let vulnerable faucets drip. A slow trickle keeps water moving and relieves pressure if ice begins to form. Choose the faucets served by exposed pipes, and run both the hot and cold sides slightly if both lines are at risk.
- Open cabinet doors. Sinks on exterior walls hide pipes inside closed cabinets, which stay colder than the room. Opening the doors on cold nights lets warm air circulate around the plumbing.
- Hold the thermostat steady. Resist deep night-time setbacks during cold snaps; a consistent temperature protects pipes inside walls, not just the rooms people sleep in.
- Never let the house fall below about 55°F (13°C). This is the widely used minimum for occupied and unoccupied homes alike. If travelling in winter, set the thermostat no lower than 55°F, and consider shutting off the water at the main and draining the lines if the house will sit empty through severe weather.
Step 5: Know Your Shut-Off Valve Before You Need It
Every homeowner should be able to answer one question in the dark: where is the main water shut-off? It is usually where the water line enters the house — in the basement, a utility room, or near the street-side meter. Find it now, make sure it turns, and show everyone in the household where it is. The main shut-off is the one that limits damage in an emergency. Labelling it with a tag is a two-minute job that saves frantic searching later.
If a Pipe Freezes Anyway
A faucet that produces only a trickle, or nothing at all, on a cold morning usually means a frozen pipe. Act promptly but calmly:
- Shut off the water to that section, or at the main valve if the frozen section is unknown.
- Open the affected faucet to relieve pressure and give melting water somewhere to go.
- Warm the pipe gently, working from the faucet back toward the frozen section. A hair dryer, a portable space heater kept at a safe distance, or towels soaked in hot water all work.
- Never use an open flame. A blowtorch or propane heater can ignite surrounding materials and can damage or burst the pipe. This is the one method to rule out entirely.
- Restore the water slowly once flow returns, and check the whole run for leaks as it thaws, since a split may only reveal itself under pressure.
If a Pipe Bursts
Turn off the main shut-off immediately — every minute of delay adds water to the house. Then switch off electricity if water is near outlets or appliances, move belongings out of the water’s path, and call a plumber. While waiting, open faucets to drain remaining pressure, begin removing standing water, and photograph the damage for insurance once the water is stopped. Fast shut-off is what separates an unpleasant bill from a major renovation.
Frequently Asked Questions
At what temperature do pipes freeze?
Pipes are at risk when temperatures fall to around 20°F (-6°C) or below for several hours, especially in uninsulated or exposed locations. Poorly protected pipes can freeze at higher temperatures during long cold spells or in strong wind.
What is the minimum temperature to keep a house at in winter?
Keep the thermostat at no lower than about 55°F (13°C), including when travelling. During cold snaps, holding a steady temperature day and night protects pipes better than deep night-time setbacks.
Should faucets drip all winter?
No — dripping is a tactic for the coldest nights, not the whole season. Let faucets served by exposed pipes trickle slowly when a hard freeze is forecast, and stop once temperatures recover.
Is heat tape safe to leave on pipes?
Yes, when it is the correct product for the pipe material and is installed as the manufacturer directs. Use thermostatically controlled tape where possible, never overlap standard tape, and inspect it each autumn before plugging it in.
Does foam pipe insulation really work?
Foam sleeves are very effective for pipes in moderately cold spaces such as basements and garages, because they slow heat loss and buy time during cold snaps. In very exposed or severe locations, insulation works best combined with heat tape and draft sealing.
What should be done first if a pipe bursts?
Shut off the main water valve immediately, then cut power to wet areas if water is near electrical fittings, and call a plumber. Knowing the shut-off location in advance is the most important preparation of all.