Every home needs small repairs sooner or later. A dripping faucet, a toilet that will not stop running, a hole in the wall from a moved picture frame: these jobs are small, but calling a professional for each one quickly adds up. The good news is that the most common DIY home repairs are genuinely easy once you know the steps, and most need only basic tools you probably already own.
This guide covers ten repairs every homeowner should know, in plain language, with the tools you need and the mistakes to avoid. Always turn off water or power before you start a job that involves either one, and if a repair involves gas, major wiring, or structural work, call a licensed professional instead.

1. Fix a Leaky Faucet
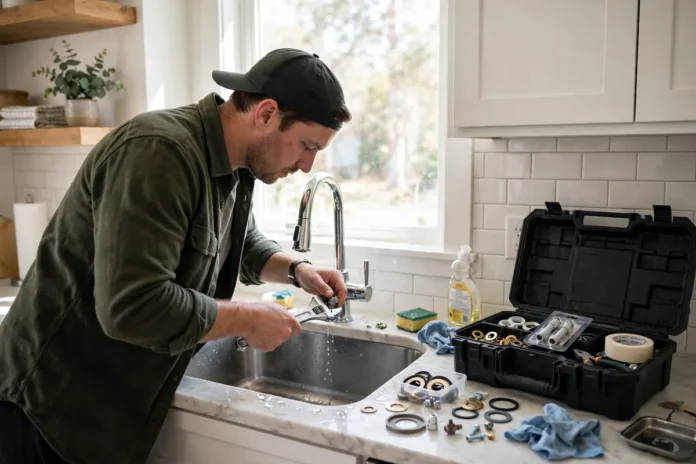
A dripping faucet is usually caused by a worn washer or cartridge, and it can waste hundreds of litres of water a year. First, turn off the water supply under the sink. Plug the drain so small parts cannot fall in, then remove the faucet handle and take out the old cartridge or washer. Take the old part to the hardware store so you buy an exact match, fit the new one, reassemble, and turn the water back on slowly. If the faucet still drips, the valve seat may be damaged, which is a job for a plumber.
2. Stop a Running Toilet
A toilet that runs constantly is usually a flapper problem. Lift the tank lid and check the rubber flapper at the bottom: if it is warped or does not seal, water leaks into the bowl non-stop. Flappers are cheap and clip on in minutes with no tools. Also check the fill valve height and the chain length; the chain should have about half an inch of slack. If the water level is above the overflow tube, lower the float. This one repair can cut a surprising amount off your water bill.
3. Patch Small Drywall Holes
Small nail holes need only a dab of spackle and a putty knife, smoothed flat and sanded once dry. For holes up to a few inches wide, use a self-adhesive mesh patch: stick it over the hole, spread joint compound over it in thin layers, let each layer dry, sand smooth, and paint. For larger holes, cut a square patch of drywall, screw it to a backing board inside the wall, tape the seams, and compound over them. Patience matters more than skill here; thin layers dry flatter than one thick coat.

4. Unclog a Drain Without Harsh Chemicals
Before reaching for chemical drain cleaner, which can damage pipes, try a plunger or a drain snake. For a slow sink, remove and clean the trap (the U-shaped pipe underneath) with a bucket beneath it; most clogs live there. A simple plastic drain stick can pull hair out of a shower drain in seconds. A plunger works best with a good seal and firm, steady strokes. If several drains back up at once, that may signal a main-line blockage, which needs a professional.
5. Silence Squeaky Doors and Floors
A squeaky door hinge usually needs only a drop of lubricant. Spray or drip lubricant onto the hinge pins, then open and close the door several times to work it in. If the squeak persists, tap a pin out, clean it, coat it lightly with petroleum jelly, and tap it back in. For squeaky floors, the noise comes from boards rubbing against nails or joists. Sprinkling talcum powder into the joints can quiet minor squeaks, while a squeak repair kit with breakaway screws gives a longer-lasting fix from above the floor.
6. Re-Caulk a Bathtub or Shower
Cracked or mouldy caulk lets water seep behind tiles and into walls, so replacing it is one of the most valuable small repairs you can do. Cut out the old caulk with a utility knife, clean the joint thoroughly and let it dry completely, then apply a smooth bead of silicone caulk made for bathrooms. Wet your finger and run it along the bead in one steady motion for a neat finish, and keep the shower dry for 24 hours while it cures.
7. Fix a Sticking Door or Window
Doors that stick usually rub because of humidity swelling or a loose hinge. First, tighten all hinge screws; if a screw hole is stripped, push a wooden golf tee coated in wood glue into the hole, trim it flush, and re-drive the screw. For a door that still rubs, mark the rubbing spot with chalk, remove the door, and plane or sand just that edge. For sticking windows, clean the tracks and apply silicone spray lubricant, never oil, which attracts dust.
8. Repair a Torn Window Screen
A torn screen is a ten-minute job with a spline roller, new mesh, and new rubber spline, all available cheaply at hardware stores. Remove the old spline and mesh, lay the new mesh over the frame, press the spline into the groove over the mesh with the roller, and trim the excess with a utility knife. Small tears under an inch can simply be patched with a clear screen repair patch, which is nearly invisible.
9. Touch Up Paint and Scuffs
Walls collect scuffs, especially in hallways and around light switches. Keep a small labelled jar of each wall colour for touch-ups. Clean the area first, then dab paint on with a small brush, feathering the edges so the patch blends in. For larger scuffed areas, a magic eraser sponge removes marks without paint, but use it gently on flat or matte finishes, which it can polish shiny. A full repaint is only needed when touch-ups become visible, and our guide to painting a room like a pro covers that job step by step.
10. Replace a Light Switch or Outlet Cover (Safely)
Cracked outlet covers are unsightly and unsafe, but replacing them is simple if you follow one rule: turn the power off at the breaker first, and test with a non-contact voltage tester before touching anything. Unscrew the old cover, fit the new one, and restore power. If you ever need to replace the switch or outlet itself rather than just the cover, and you are not confident with wiring, hire an electrician. Electricity is the one area where guessing is never worth it.
The Basic DIY Toolkit Every Home Should Have
Most of the repairs above need only a small toolkit: a hammer, a set of screwdrivers, an adjustable wrench, pliers, a tape measure, a utility knife, a putty knife, a cordless drill, a spirit level, and a non-contact voltage tester. Add a plunger, a drain snake, duct tape, and a tube of silicone caulk, and you can handle the majority of everyday home repairs. Buy tools once and buy decent ones; cheap tools break at the worst moment.
It also pays to keep a home maintenance routine. Seasonal jobs like the ones in our winterize your home checklist prevent many repairs from being needed at all, and small upgrades like the budget kitchen updates in our earlier guide can be done with the same basic skills.
When to Call a Professional
DIY has limits, and knowing them protects your home and your safety. Call a professional for anything involving gas lines, main electrical panels, roof structure, foundation cracks, mould over a small area, or water damage that has spread inside walls. A good rule: if you cannot see the full problem, or if a mistake could flood, burn, or collapse something, it is not a DIY job. Paying a professional once is always cheaper than fixing a botched repair twice.
Frequently Asked Questions
What is the easiest DIY home repair for a beginner?
Replacing a toilet flapper or an outlet cover is a great first repair. Both take under fifteen minutes, need almost no tools, and give you instant confidence for bigger jobs.
How much money can DIY home repairs save?
A plumber’s call-out for a running toilet or dripping faucet can cost many times the price of the part itself, which is often just a few dollars. Across a year, handling the ten repairs in this guide yourself can save hundreds of dollars.
Should I use chemical drain cleaners?
Avoid them when possible. They can damage older pipes, harm septic systems, and splash back dangerously. A plunger, drain snake, or cleaning the trap solves most clogs more safely.
How do I know if a repair is safe to DIY?
Ask whether the job involves gas, high-voltage wiring, structural support, or hidden water damage. If the answer is yes, or if you are unsure, get a licensed professional. For everything else, follow instructions carefully and take your time.
Final Thoughts
Learning these ten DIY home repairs turns you from a homeowner who waits for problems into one who fixes them. Start with the smallest job on the list, build your toolkit gradually, and keep notes on what you did and which parts you used. Your home will thank you, and so will your wallet.